
How to Set Up the Android Emulator in Android Studio
Step by step guide to setting up the Android emulator in Android Studio. Covers AVD creation, hardware acceleration, common errors, performance tuning, and command-line management.
- Written by
- Gautam Agarwal
- Read time
- 17 min read
- Published

The Android emulator is a virtual device that runs a full Android operating system on a development machine, allowing developers and testers to build, test, and debug Android applications without a physical device. It ships as part of Android Studio and runs on Windows, macOS, and Linux through hardware-accelerated virtualization.
Setting up the emulator takes five to ten minutes on a machine that meets the hardware requirements. Most setup problems trace back to three causes: hardware acceleration is not enabled, the system image is not installed, or the machine does not have enough RAM to run the emulator alongside Android Studio. This guide walks through the full setup, covers every common error, and explains how to optimize the emulator for daily testing use.
Key Takeaways
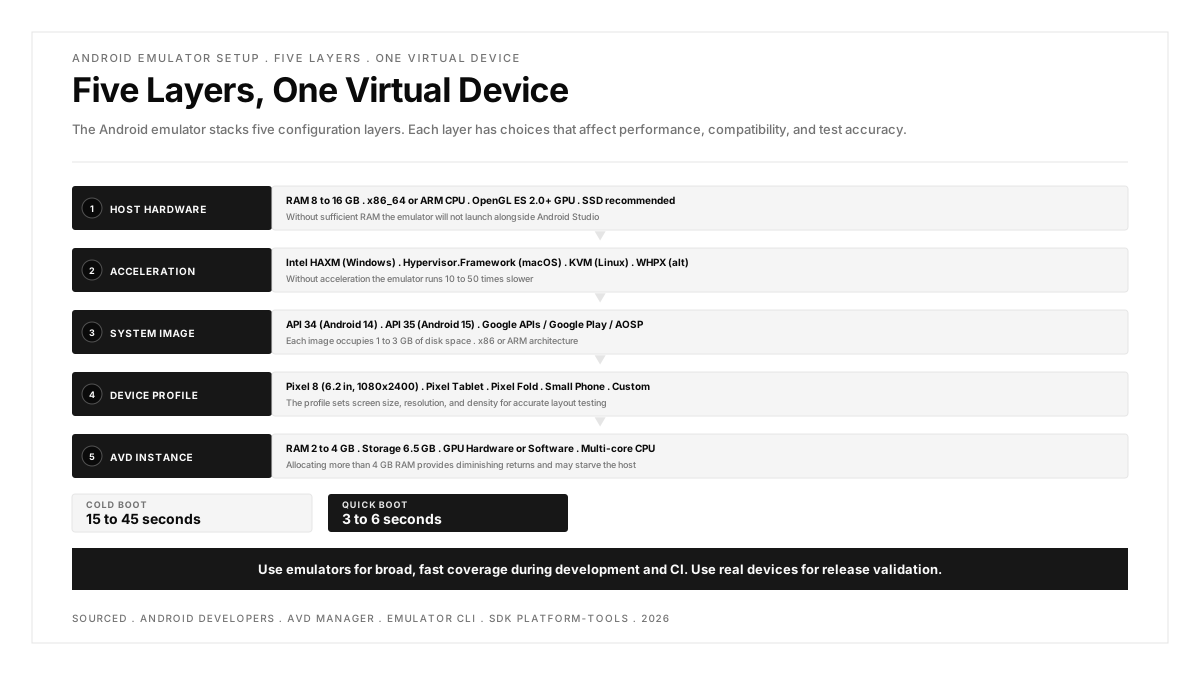
- The Android emulator requires hardware acceleration (Intel HAXM on older Intel Macs, Hypervisor.Framework on Apple Silicon Macs, WHPX or HAXM on Windows, KVM on Linux). Without it, the emulator runs 10 to 50 times slower.
- AVD Manager in Android Studio creates and manages virtual devices. Each AVD combines a device profile (screen size, resolution, density) with a system image (Android version and API level).
- Google Play system images include the Play Store, which is useful for testing apps that depend on Google Play Services. Google APIs images include the services but not the Store.
- The emulator consumes 2 to 4 GB of RAM per instance. Running Android Studio and the emulator simultaneously requires a minimum of 8 GB of system RAM, with 16 GB recommended.
- Cold boot takes 15 to 45 seconds. Quick Boot saves and restores the emulator state, reducing subsequent launches to 3 to 6 seconds.
Prerequisites
Before creating a virtual device, verify that the development machine meets these requirements.
Hardware
| Component | Minimum | Recommended |
|---|---|---|
| RAM | 8 GB | 16 GB |
| Disk space | 16 GB free | 40 GB free (multiple system images) |
| CPU | x86_64 with virtualization support | Multi-core x86_64 or Apple Silicon |
| GPU | Any with OpenGL ES 2.0 | Dedicated GPU with OpenGL ES 3.1 |
Software
- Android Studio installed from developer.android.com/studio. The emulator ships with the Android SDK, which Android Studio installs automatically.
- Hardware acceleration enabled in BIOS/UEFI. Intel machines need Intel VT-x enabled. AMD machines need AMD-V (SVM) enabled. Apple Silicon Macs have acceleration built in with no BIOS change required.
Verify hardware acceleration
Open a terminal and check:
macOS (Apple Silicon):
Output should show kern.hv_support: 1.
macOS (Intel):
Output should include VMX.
Linux:
Output greater than 0 confirms virtualization support.
Windows (PowerShell):
Look for "Hyper-V Requirements" at the bottom. "Virtualization Enabled In Firmware: Yes" confirms support.
Step 1: Install the required SDK components
Open Android Studio and navigate to Settings > Languages and Frameworks > Android SDK (on macOS: Android Studio > Settings > Languages and Frameworks > Android SDK).
Under the SDK Platforms tab, check the Android version you want to emulate. For broad testing coverage, install at least the current stable release and one version back. As of late 2026, Android 15 (API 35) and Android 14 (API 34) cover the majority of active devices.
Under the SDK Tools tab, verify these are checked:
- Android SDK Build-Tools
- Android Emulator
- Android SDK Platform-Tools
Click Apply and wait for the downloads to complete.
Step 2: Create an Android Virtual Device (AVD)
- Open Device Manager from the toolbar (the phone icon with the Android head) or from Tools > Device Manager
- Click Create Virtual Device
- Select a hardware profile. The profile defines the screen size, resolution, and density. Common choices:
- Pixel 8 (6.2 inch, 1080x2400, 420 dpi) for a standard modern phone
- Pixel Tablet for tablet testing
- Pixel Fold for foldable testing
- Small Phone for testing on constrained screen sizes
- Click Next
- Select a system image. Choose the tab matching the target:
- Recommended shows pre-downloaded and commonly used images
- x86 Images for Intel/AMD machines
- ARM Images for Apple Silicon Macs (displayed under Recommended)
- Click the download icon next to any image that is not yet installed
- Choose between image variants:
- Google APIs includes Google Play Services (Maps, Firebase, etc.)
- Google Play includes Google Play Services and the Play Store app
- AOSP (no Google suffix) is bare Android without Google services
- Click Next
- Configure the AVD:
- AVD Name: a descriptive name like "Pixel_8_API_35"
- Startup orientation: Portrait or Landscape
- Click Show Advanced Settings to set RAM, VM heap, internal storage, and SD card size
- Click Finish
The AVD now appears in Device Manager. Click the play button to launch it.
Step 3: Launch and verify
The first launch performs a cold boot, which takes 15 to 45 seconds depending on the system image and host machine speed. The emulator window opens showing the Android boot animation, followed by the home screen or lock screen.
Verify the setup is working:
- Check the Android version: Open Settings > About Emulated Device and confirm the Android version matches the system image
- Test network connectivity: Open Chrome and load a web page
- Verify Google Play Services (if using a Google APIs or Google Play image): Open Settings > Apps > Google Play Services and confirm the version number appears
- Connect from Android Studio: Open the Running Devices panel. The emulator should appear as a deployment target for any project
Step 4: Enable Quick Boot
Quick Boot saves the emulator's state when it closes and restores it on the next launch, reducing startup time from 15 to 45 seconds down to 3 to 6 seconds.
Quick Boot is enabled by default in current versions of the emulator. To verify or change the setting:
- Open Device Manager
- Click the three-dot menu on the AVD
- Select Edit
- Click Show Advanced Settings
- Under Emulated Performance, find Boot option
- Select Quick Boot (saves and restores state)
The first close after enabling Quick Boot takes a few extra seconds to save the snapshot. Every subsequent launch loads from the saved state.
Common errors and fixes
"HAXM is not installed" or "Emulator requires hardware acceleration"
Cause: The Intel Hardware Accelerated Execution Manager is not installed, or hardware virtualization is disabled in BIOS.
Fix on Windows:
- Enter BIOS/UEFI and enable Intel VT-x or AMD SVM
- In Android Studio, go to Settings > Languages and Frameworks > Android SDK > SDK Tools
- Check Intel x86 Emulator Accelerator (HAXM installer) and click Apply
- Alternatively, enable Windows Hypervisor Platform (WHPX) in Windows Features
Fix on macOS Intel:
- Run sudo kextload /Library/Extensions/intelhaxm.kext in Terminal
- If HAXM installation fails, ensure SIP (System Integrity Protection) is not blocking it
Apple Silicon Macs: HAXM is not needed. The emulator uses Hypervisor.Framework natively. If you see this error on Apple Silicon, update Android Studio and the emulator to the latest version.
"Emulator: Process finished with exit code 1"
Cause: Multiple possible causes. The most common:
- Insufficient RAM: The emulator cannot allocate the configured RAM. Close other applications or reduce the AVD's RAM allocation in the AVD configuration.
- Corrupted AVD: Delete the AVD from Device Manager and recreate it.
- Outdated emulator: Update the Android Emulator in SDK Manager > SDK Tools.
- GPU driver conflict: In the AVD configuration, change the Emulated Performance graphics setting from "Automatic" to "Software" to rule out GPU driver issues.
"System UI has stopped" or repeated crashes on boot
Cause: The system image is corrupted, or the Quick Boot snapshot is stale.
Fix: Cold boot the emulator to bypass the saved state:
- In Device Manager, click the three-dot menu on the AVD
- Select Cold Boot Now
If cold boot also crashes, delete the AVD and recreate it with a freshly downloaded system image.
"Waiting for target device to come online"
Cause: Android Studio cannot communicate with the emulator through ADB.
Fix:
- Open a terminal and run adb devices. If the emulator is listed as "offline" or not listed at all:
- Run adb kill-server followed by adb start-server
- If the problem persists, close the emulator and relaunch it from Device Manager
Emulator runs but is extremely slow
Cause: Hardware acceleration is not functioning, or the host machine has insufficient resources.
Fix:
- Verify hardware acceleration is enabled (see Prerequisites section)
- Allocate at least 2 GB RAM to the AVD
- Enable GPU acceleration: set Graphics to "Hardware" in AVD configuration
- Close unnecessary applications to free system resources
- On Windows, disable Hyper-V if using HAXM (HAXM and Hyper-V cannot coexist; use WHPX instead if Hyper-V is needed)
Performance optimization
Allocate appropriate RAM
The default RAM allocation (1.5 GB) is often insufficient for modern apps. Set it to 2 GB for lightweight apps and 4 GB for apps using heavy media, maps, or multiple processes. Allocating more than 4 GB provides diminishing returns and may starve the host machine.
Use hardware GPU acceleration
In the AVD configuration, set Graphics to Hardware (GLES 2.0). This offloads rendering to the host GPU, which improves frame rates from 15 to 20 fps (software rendering) to 50 to 60 fps (hardware rendering). If the emulator shows graphical glitches, fall back to "Software."
Enable multi-core CPU support
Modern emulator versions use multiple host CPU cores by default. Verify by checking the AVD's advanced settings: the Multi-Core CPU option should be enabled and set to match the host machine's available cores (typically 2 to 4 for the emulator).
Use an SSD
The emulator reads and writes the virtual disk image continuously. On an HDD, this creates a bottleneck that makes the emulator noticeably sluggish. An SSD eliminates this bottleneck.
Trim the AVD's internal storage
The default 6.5 GB internal storage is sufficient for most testing. Increasing it to 16 GB or higher increases the virtual disk image size and slows snapshot save/restore. Only increase storage if the app under test requires it.
Managing emulators from the command line
The command-line emulator is useful for CI pipelines, scripted testing, and environments where Android Studio is not installed.
List available AVDs
Launch an AVD
Launch with a cold boot (ignore saved state)
Launch headless (no GUI window)
This is the standard mode for CI servers that do not have a display. The emulator runs in the background and is accessible through ADB.
Launch with a specific port
Useful when running multiple emulators in parallel. Each emulator uses two consecutive ports (console and ADB), so space them by at least 2.
The emulator binary is located at $ANDROID_HOME/emulator/emulator. If the command is not found, add $ANDROID_HOME/emulator to the system PATH.
For the full command-line reference, see the Android emulator command-line documentation.
Emulator vs real device for testing
The emulator and physical devices serve different purposes in the testing workflow. Neither replaces the other.
| Capability | Emulator | Real Device |
|---|---|---|
| Boot time | 3 to 45 seconds | Always on |
| Cost per device | Free | $200 to $1,200 per device |
| Android version flexibility | Any version, any API level | Fixed to manufacturer updates |
| Screen size variety | Any profile, including custom | One per device |
| Hardware sensor accuracy | Simulated (GPS, accelerometer, camera) | Real hardware behavior |
| Push notifications | Supported with Google Play image | Full native support |
| Biometric authentication | Simulated fingerprint only | Full Face ID/fingerprint |
| Thermal throttling | Not simulated | Real CPU throttling under load |
| Battery behavior | Simulated | Real drain and charging |
| Carrier network behavior | Wi-Fi only (no cellular simulation) | Real carrier, real latency |
Recommended approach: Use emulators for broad, fast coverage during development and CI. Use real devices for release validation, performance testing, and scenarios that depend on hardware behavior. For a deeper comparison, see the guide on emulator testing vs real devices.
Testing across multiple Android versions and screen sizes on the emulator is essential for catching device fragmentation issues before they reach users.
Using the emulator for automated testing
Running instrumented tests
Android's instrumented test framework runs tests on the emulator through Gradle:
This builds the app and test APK, installs both on the connected emulator, runs the tests, and reports results. The emulator must be running and visible to ADB before the command executes.
Running tests across multiple API levels
Create multiple AVDs targeting different API levels and run the test suite against each:
This sequential approach tests the same suite across multiple Android versions, catching compatibility issues that a single-version test run would miss.
Emulator in CI pipelines
CI platforms that support macOS or Linux runners can boot the emulator headless. The standard pattern:
- Create the AVD using avdmanager
- Launch the emulator headless with -no-window -no-audio
- Wait for the emulator to finish booting with adb wait-for-device and a boot completion check
- Run the test suite
- Kill the emulator
For teams evaluating the broader Android testing tool landscape, the emulator is the foundation that most other tools build on.
FAQs
How much disk space does the Android emulator need?
Each system image occupies 1 to 3 GB, and each AVD's virtual disk adds 6 to 16 GB depending on internal storage configuration. A setup with three system images (three Android versions) and three AVDs uses roughly 30 to 40 GB. SSD storage is strongly recommended because the emulator performs continuous disk I/O.
Can I run the Android emulator on Apple Silicon Macs?
Yes. The Android emulator runs natively on Apple Silicon (M1, M2, M3, M4) using ARM-based system images. Performance is excellent because the emulator does not need x86 translation. Use system images labeled "arm64" or those listed under the Recommended tab in AVD Manager. Intel HAXM is not needed and should not be installed on Apple Silicon.
Why is the Android emulator so slow?
The three most common causes: hardware acceleration is not enabled (check BIOS and SDK Manager), the AVD has too little RAM allocated (increase to 2 to 4 GB), or the host machine has insufficient free memory (close other applications). GPU acceleration set to "Software" instead of "Hardware" also degrades performance significantly. On Windows, running HAXM with Hyper-V active creates a conflict that disables acceleration.
Can I run multiple emulators at the same time?
Yes. Each emulator instance uses a separate port pair. Launch additional instances with the -port flag or through Device Manager. Each instance consumes 2 to 4 GB of RAM, so the host machine needs sufficient memory. Running three emulators plus Android Studio requires at least 16 GB of RAM.
How do I update the Android emulator?
Open Settings > Languages and Frameworks > Android SDK > SDK Tools in Android Studio. If an update is available for "Android Emulator," check it and click Apply. Updates are also available through the command line with sdkmanager --update. Keeping the emulator current is important because updates include performance improvements, bug fixes, and support for new Android API features.
How do I test different screen sizes without creating many AVDs?
The emulator supports resizing the window to simulate different screen dimensions. However, for accurate testing, create separate AVDs with different hardware profiles. The Device Manager includes profiles for phones, tablets, foldables, wearables, and automotive displays. Each profile sets the correct screen density, which affects how the Android layout system renders the UI. A resized window does not change the reported density, so it can produce misleading results for layout testing.